This is about the lessons I’ve learned from raising rabbits. Most of these are self-taught, and mostly due to doing things the wrong way the first time. And sometimes second.
This is also timely for a couple of reasons. I’ve given out some rabbit samples to some co-conspirators that wanted to try it, thinking they may raise some for their own. This is also the prime time for breeding here in Florida, as the summers tend to get way to hot for a successful breeding season. Better to let the does rest up for pumping out though tasty little bundles of yumminess.
…………………….
I can be called cheap, though prefer the term “thrifty”. I’m also very do-it-myself about a lot of things, so when I first got into rabbits, I decided to build my own cages. How hard can it be, right?
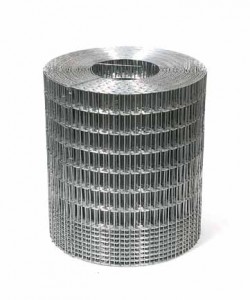
I opted to go with traditional all-wire cages, as EVERYONE does it, and those that don’t eventually switch over due to cleaning issues. Cage materials should be of the highest quality, since they will get worn out from constant soaking from urine. You will need to replace cage bottoms no matter what you use, unless you can find stainless steel, end even then probably.
Wire type
I prefer galvanized AFTER welding, since it protects the metal better, giving a longer life.
Wire Spacing
For the cage bottoms, DO NOT USE HARDWARE CLOTH OF ANY SIZE! Its just not stiff enough for rabbits, and wear out VERY quickly when hit with urine. Don’t DOn’T DON’t DON’T use hardware cloth!
What you should use for ALL cage bottoms is 14 gauge 1 inch x 1/2 inch mesh, galvanized after weld. This is a non-negotiable item, if you ask me. This allows plenty of support for weight, and still allows the rabbit coco puffs to fall through.
Dimensions
Wire typically comes in 18, 24, 30, 36, and 48 inch widths. Space requirements is based on the breed size. Try to round up for your animals comfort.
Rabbits space requirements:
Singles:
9-11 lbs (24″ x 24″)
12+ lbs (24″ x 30″)
Does with Litters:
9-11 lbs (30″ x 30″)
12+ lbs (36″ x 30″) or
A nursing doe needs much more space than a single rabbits – she has a room full of kids! I also suggest using “Baby Saver” wire for cage sides, to keep newborn babies from getting out. Nothing is more sad than to see a dead baby rabbit with his little head stuck in a 1×1 inch square wire opening.  Ask me how I know. Alternatively, use some the the flooring wire (1 x 1/2) to make a add-on barrier around the entire bottom 3 or 4 inches of the breeder doe cage.
Here is my self-taught lesson #1 – USE BABY SAVER WIRE (or an alternative) !!!!!!!!!!!!!
Cage Placement:
First, in a shaded spot, if you are in Florida. Also plenty of ventilation is needed. Keep this in mind.
I thought I would be smart and put each cage in a 2×4 wooden skeleton frame with a plastic runner carpet under each cage to funner the wastes into a Rubbermaid bin. It worked wonderfully! For about two weeks. Rabbit like to aim their urine stream, typically in the same spot. Over and over again. And it seemed like mine preferred to aim it at the lumber. I wasn’t aware just how much urine a 2×4 can soak up. About 6 weeks after I got started, I decided my idea was NOT going to work.
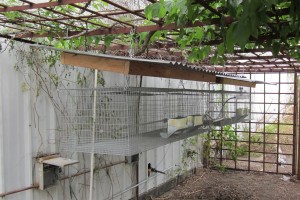
 So I build a MUCH larger wooden skeleton frame with corrugated plastic roofing, and about a foot of distance between any wood and where a cage would be suspended. A second corrugated roof was placed half way down with cross beams to suspend a second row of cages. I still get accumulation, but this has worked FAR better.
So my self-taught lesson #2 – Suspend your cages!
Another problem I had was the time I had to spend carrying water to each cage. Living in Florida, I don’t have issues with lines freezing so I quickly found it economical to spend the money on a self-watering system.
I opted for a bucket with an autofill valve, much like what is found in a toilet tank. It sits on top of a cage, above all of the cages, and uses gravity to feed water to each cage, delivered via flexible 1/4 inch tubing to nipple waterers. Total cost was about $60, and for another $25, I was able to tie in my chicken waterer as well. All animals now get water supplied to them 24/7, as long as I have electricity to my well pump.
Self-taught lesson #3 – Auto waterers!
 Another lesson I quickly realized is to use “J” feeders, but only with ones that have lids (to eliminate squirrels and water from getting in) and a bottom screen to eliminate “fines”, or powdered pellet dust. The dust seems to annoy the rabbits, and since they won’t eat it, it is just wasted anyway.
———————————————————————————————————–
So my optimum setup, should I ever have to do it again, is this:
- All 30×30 cages (for bucks and does) with
- 14 gauge 1 inch x 1/2 inch mesh bottoms
- Baby Saver wire bottoms
- (I’ve seen cage kits for this type of cage for under $30 each.)
- Suspended cages
- an auto-watering system,
- “J” feeders with lids and screen bottoms.
————————————————————————————————————
I’m sure there are dozens of other things I’ve learned about raising rabbits that have made my experience better after having learned a lesson the hard way…that’s what life is about, learning from your mistakes. I don’t expect you all to take what I said as gospel, and if you do, I’m sure some of what I’ve said won’t work for you.
The one thing I DO want you to learn is that mistakes cannot be made if you don’t try. And if you learn best by making mistakes, doesn’t that mean you should try EVERYTHING so that you will learn more?
Just have fun while you are doing it….
Peace,
db
I love rabbit .Thank for any information
You are welcome!