Day two in Quail Week in celebration of finally getting my quail setup mostly organized, and at least moving forward. Today we talk about incubators, hows and whys, commercial and DIY options, how I made mine, and the results I’ve had with it.
Incubators are merely simulated mothers, offering the proper amount of heat and humidity to cause a fertile egg to develop into a baby bird, and to some extent reptiles also (though I PROMISE to never get into snake farming).
Since I am on the topic of quail eggs, incubators, and snakes…this reminds me of a funny story involving quail eggs placed as though some rare-ish snake had laid them. The truth came out almost immediately, but I would have probably let the eggs get incubated just to see the faces of the snake guys when birds popped out 😛
Almost anything with a constant heat source that can maintain a certain temperature range can act as an incubator. I’ve heard of folks using crock pots, electric skillets, and my favorite method, an inter-species surrogate mother – in this case a bird used to hatch another species eggs.
When I was a kid, we had a broody hen that hatched out a dozen duck eggs. (The poor hen almost lost her mind one moring when “her babies” wading into the nearby stream like they weren’t afraid of water.) I’ve also used a bantam hen, a very small breed of chicken, to incubate quail eggs before I had an incubator.
I wasn’t sure if I would use it enough to justify the price of one that offered the features I wanted, but I was sure that if I were to have one, it would have a fan on it. There are two types of non-commercial incubators, still air and forced air. They are just as the names state, one pushes the air around, one doesn’t. The one with moving air tends to have a more uniform temperature, and therefore tends to have better hatch rates, all other things being equal. Anything to improve my odds was a good thing.
Prices on incubators start at around $20 for a still-air unit that will hold approximately 3 chicken eggs, 4 pheasant eggs, 2 turkey or duck eggs, 8 quail eggs and is slightly larger than a softball.
On the other end of the scale is a model that includes a digital menu driven incubator calibrated from factory with digital temperature and humidity readout, high and low temperature alarm and includes an autoturn cradle….for around $400.
Twenty dollars is a good price point for me, but being a still-air unit, and its very limited capacity didn’t fit what I wanted. It was a good unit, but simply didn’t fit my needs. So, I decided to build one after looking at buying options.
For the “typical” farm birds (chicken, duck, quail, goose, pheasant, etc), temperatures ranging from 97F – 101F will work with varying levels of success. The commonly accepted “ideal” temperature is 99.5F.
Humidity is also an important factor. Humidity determines how much of the egg evaporates while it is developing. Too low, and the chick will stick to the shell. Too high, and not enough liquid will evaporate, causing an air shortage inside and an over-sized chick with not enough leg room to get out of the shell during the hatch. Humidity levels between 55% – 70% are considered acceptable, and 60% being optimal.
A few weeks of researching kept bringing me back to Backyard Chickens.com and their collection of home made incubators. The majority all had several things in common:
- Constructed from a cooler, usually Styrofoam.
- Included a fan.
- Used a light bulb for heat.
- Cost significantly less than commercial options, yet yielded similar results.
I was sold.
About that time, I saw my neighbor was throwing out an Omaha Steak shipping cooler, made from some serious Styrofoam. I snagged it up and started collecting other bits and pieces.
The parts I scavenged were (click links for examples or to buy if you cannot scavenge them):
- Wire and a plug
- A 12v “Wall wort” power supply that was originally a charger for a Blackberry PDA.
- A 12v 80mm computer cooling fan
- A square paver brick that fit into the bottom of the cooler
- 1/4 inch mesh hardware cloth
- Glass from an old picture frame
- a sheet of roofing tin
- various screws for assembly
- An incandescent light bulb, 40w
- Tape and glue
Parts I had to purchase:
-
Porcelain light fixture $4.18
Total out of pocket is $20.91 if I had to buy it today off Amazon today(I get free delivery, being a Prime Member). I originally got all of my stuff at Home Depot, but I promise I paid less than $20 total.
The process:
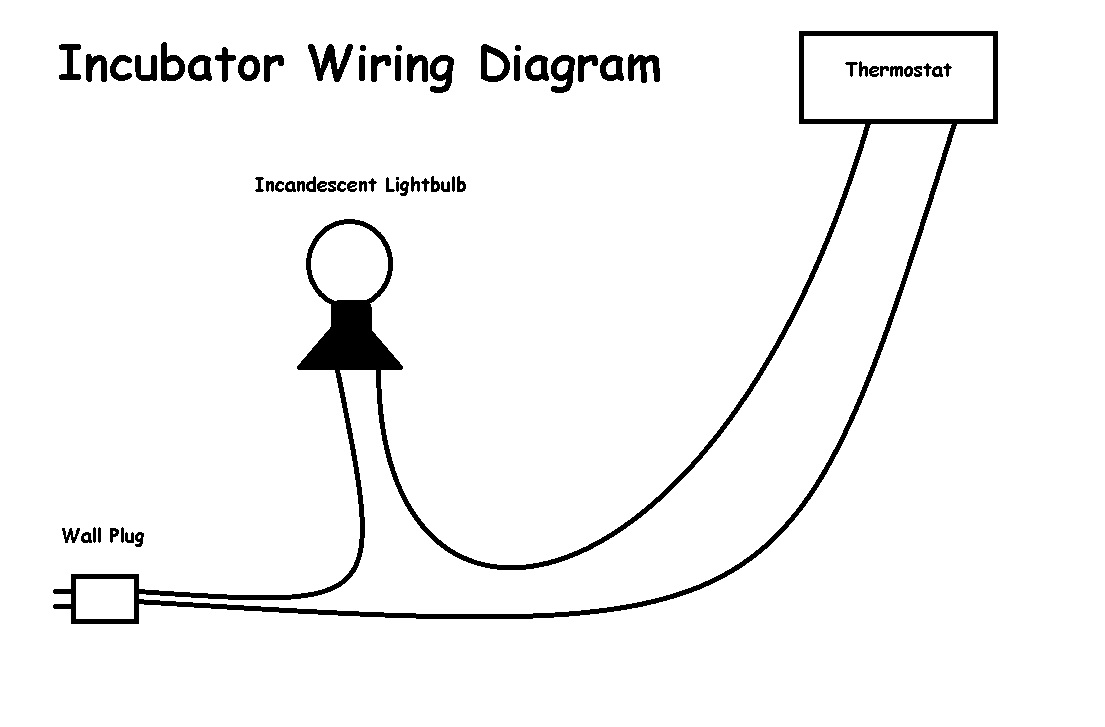
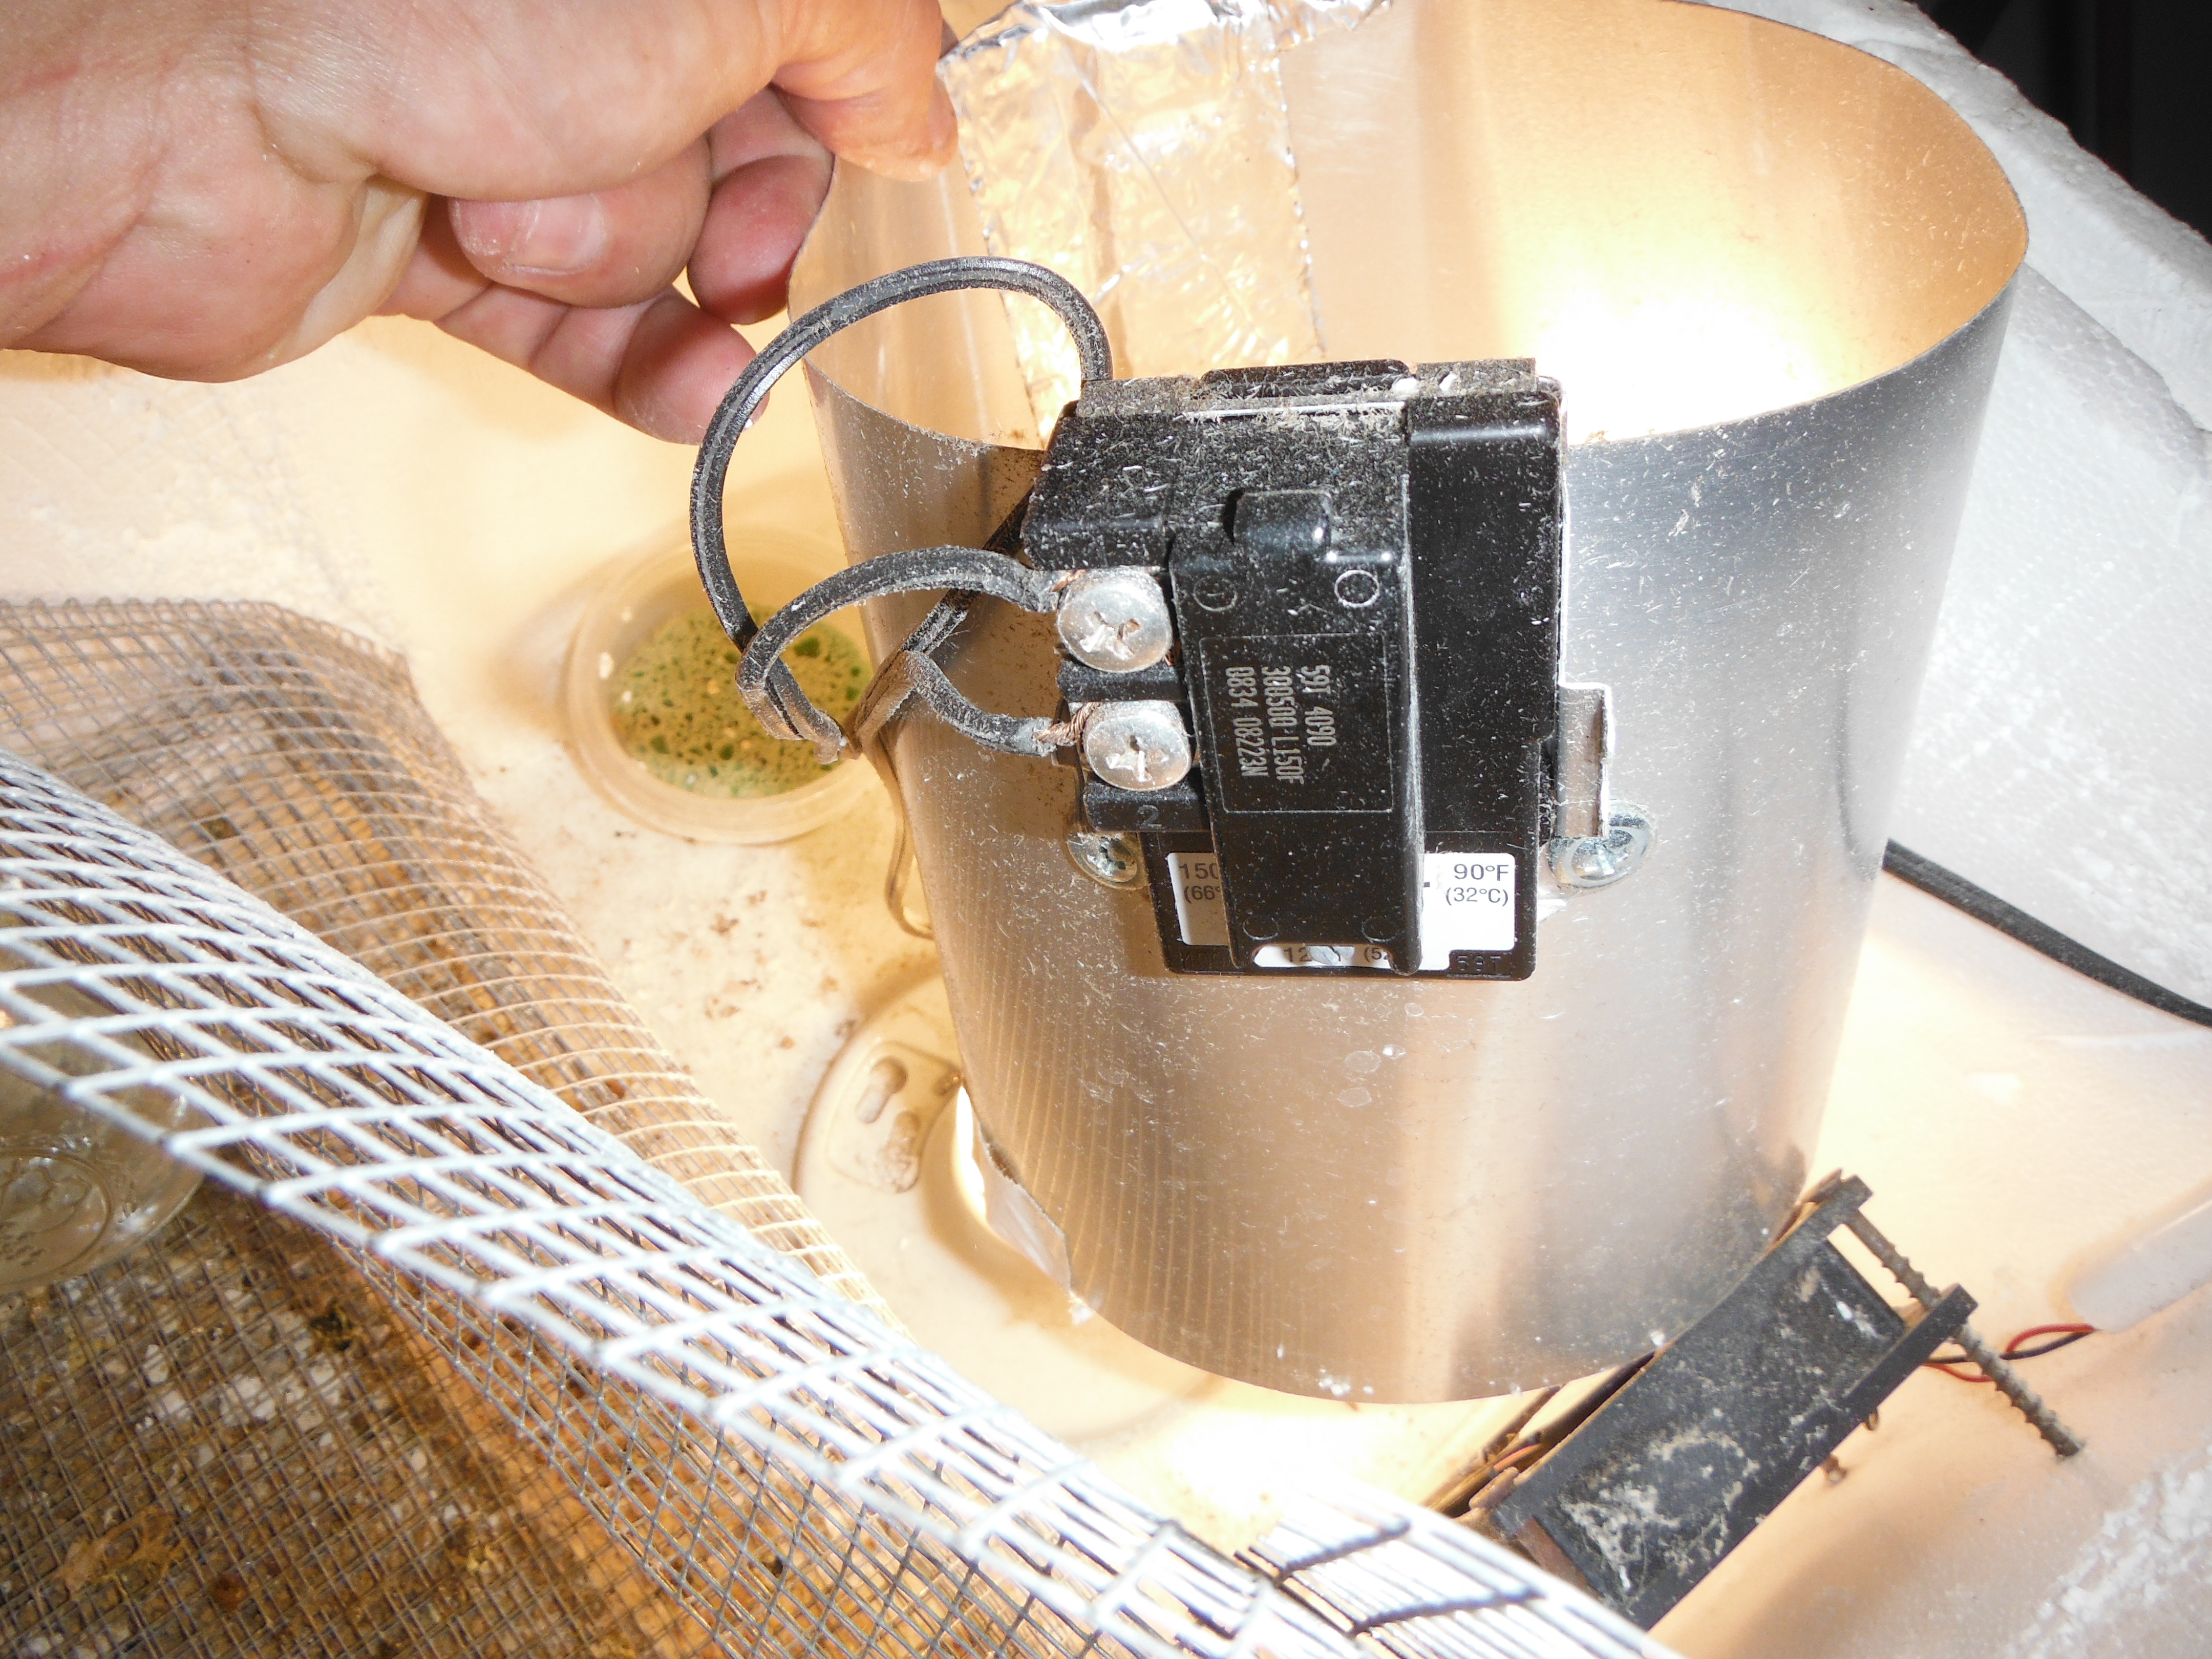
Wiring is the most complicated part, and even that is rather simple. The thermostat is placed in-line allowing it to regulate poser to the bulb. Too cold, it turns on, too hot, it turns off. Regulated temperature saves me a LOT of fiddling.
Notice the circulation fan in the lower right of the picture
Using screws, I made a circular shield out of roofing tin to go around the light bulb and fixture. This protected the Styrofoam from the heat of the bulb, and gave me a place to attach the thermostat that would have good thermal conductivity. The shield would hold the heat better and give a more stable reading for the thermostat. A metal coffee can would have worked, but I didn’t have one, so I improvised.
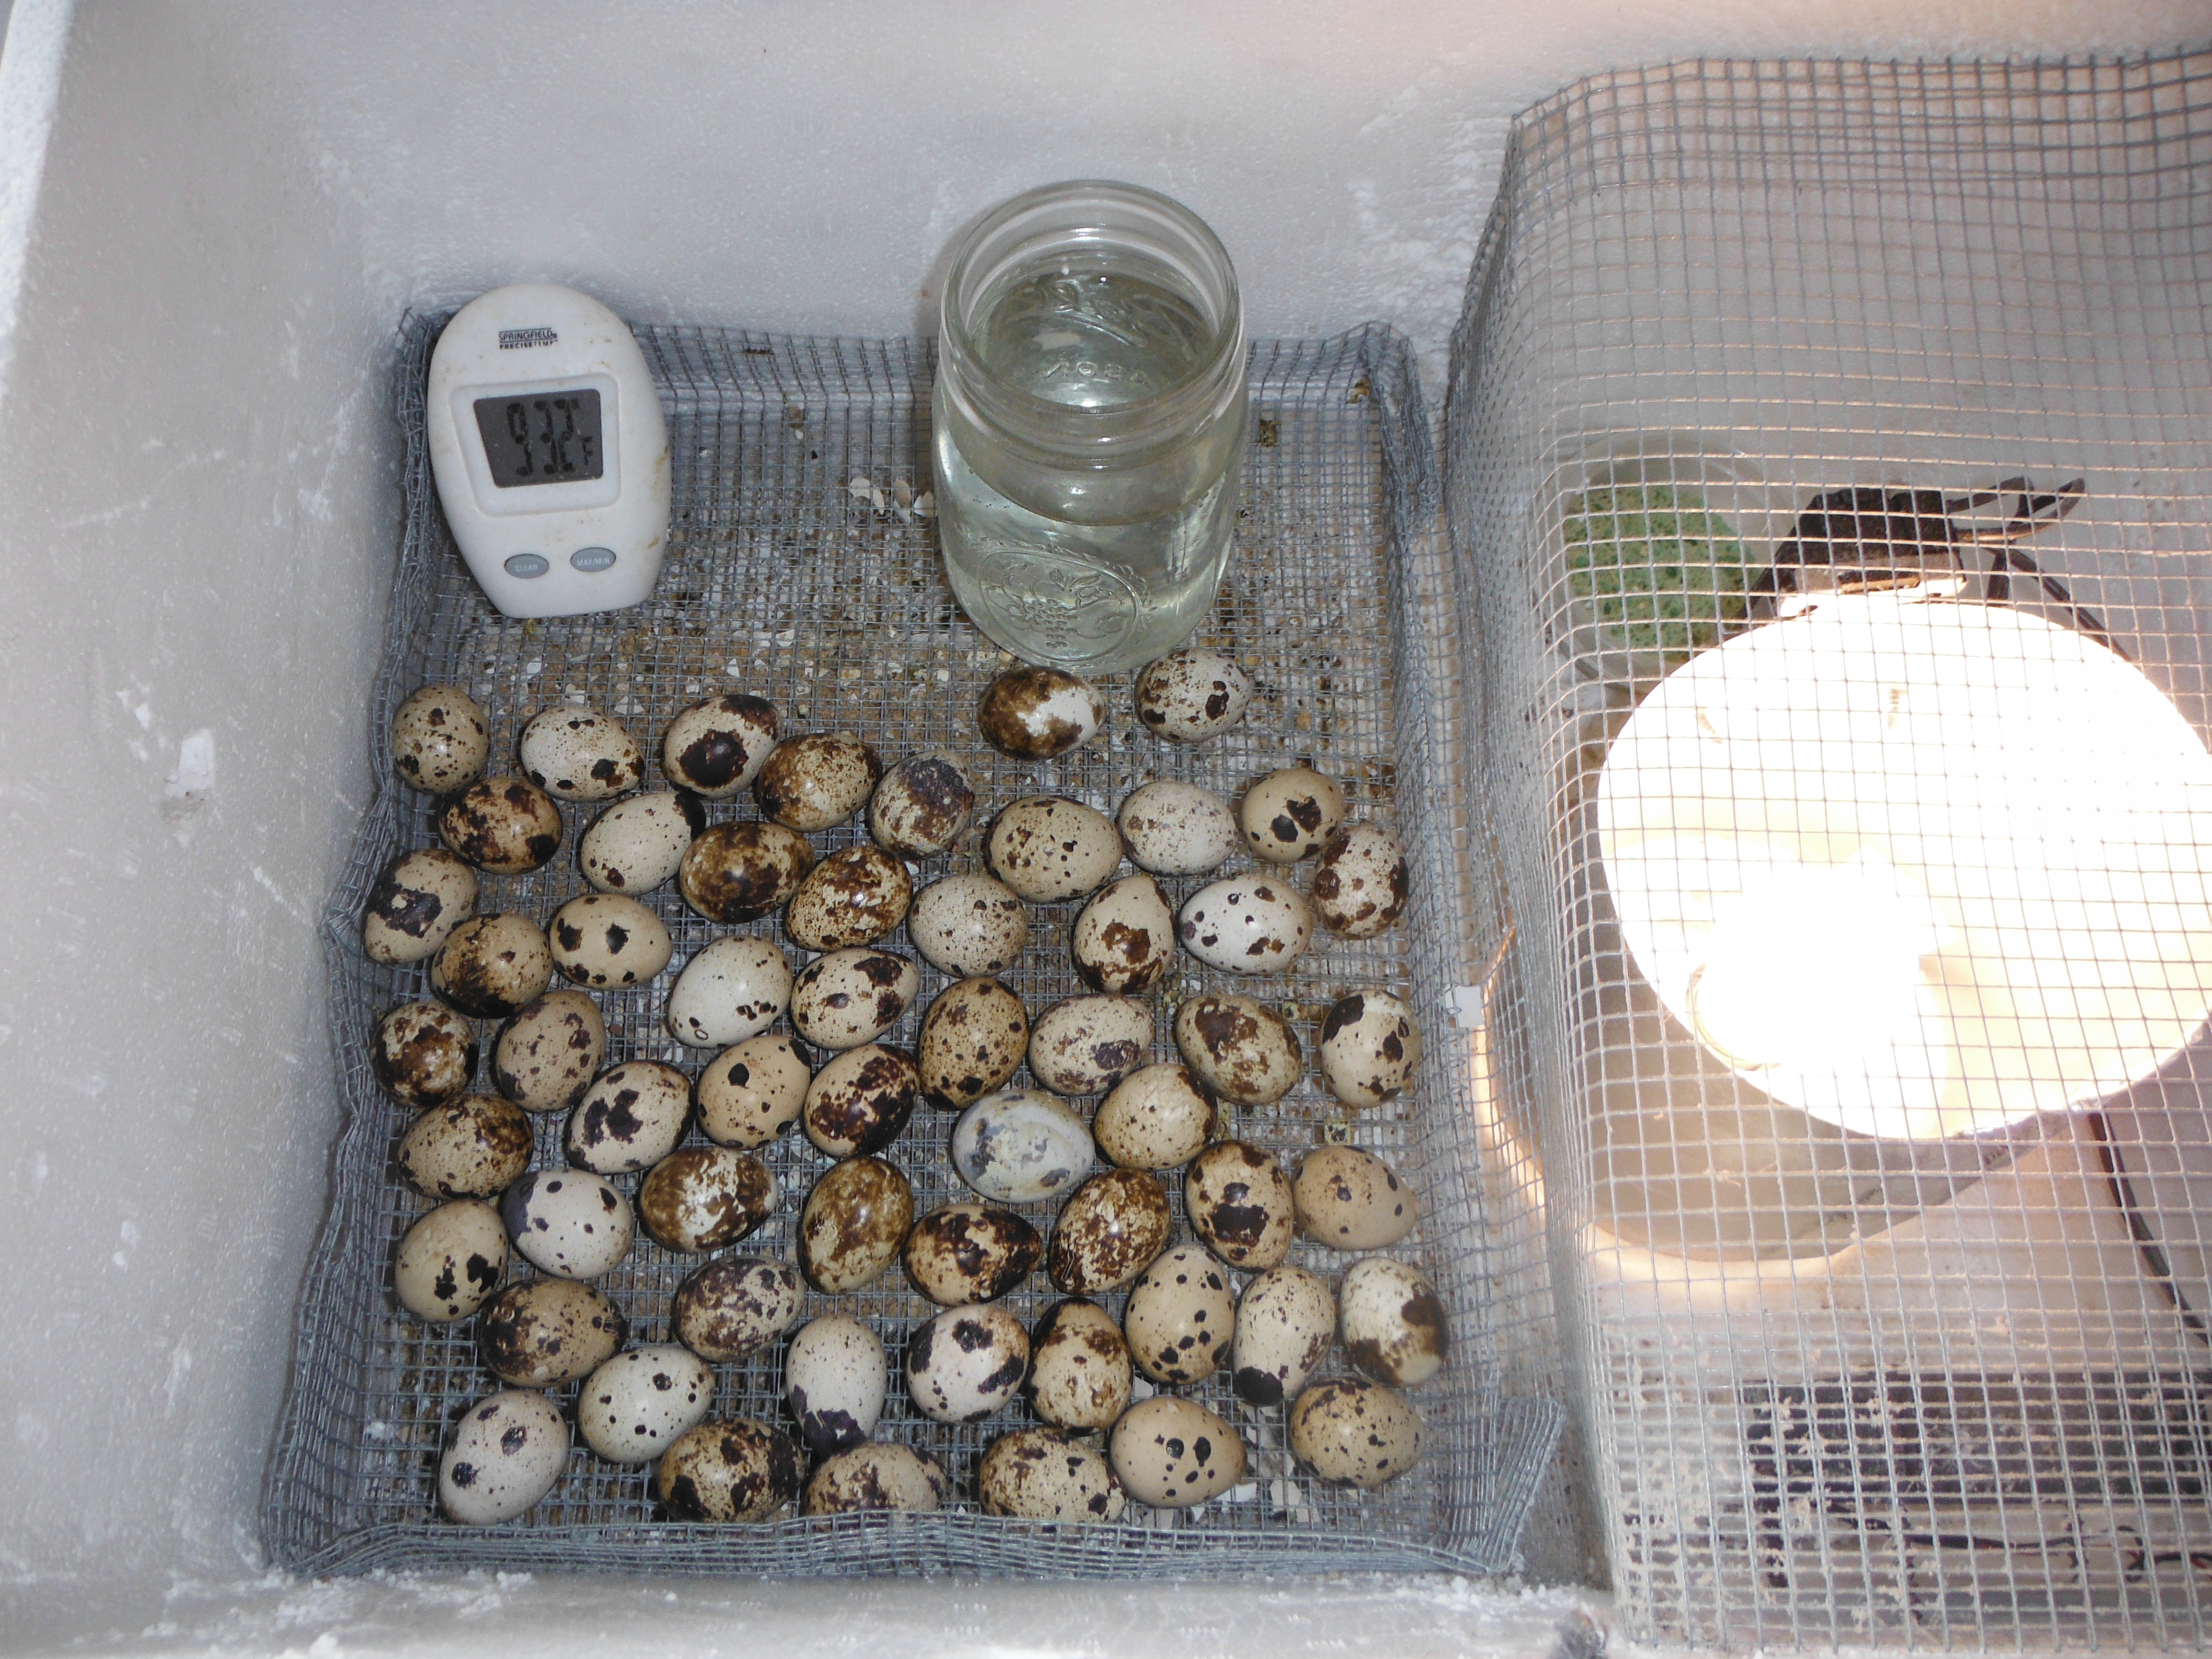
In the bottom of the cooler, I placed a 12x12x1 concrete paver to act as thermal mass. This would heat up slowly, but also cool off slowly, yielding a more stable temperature. I also included a pint jar of water for thermal mass, placing it on top of the hardware cloth.
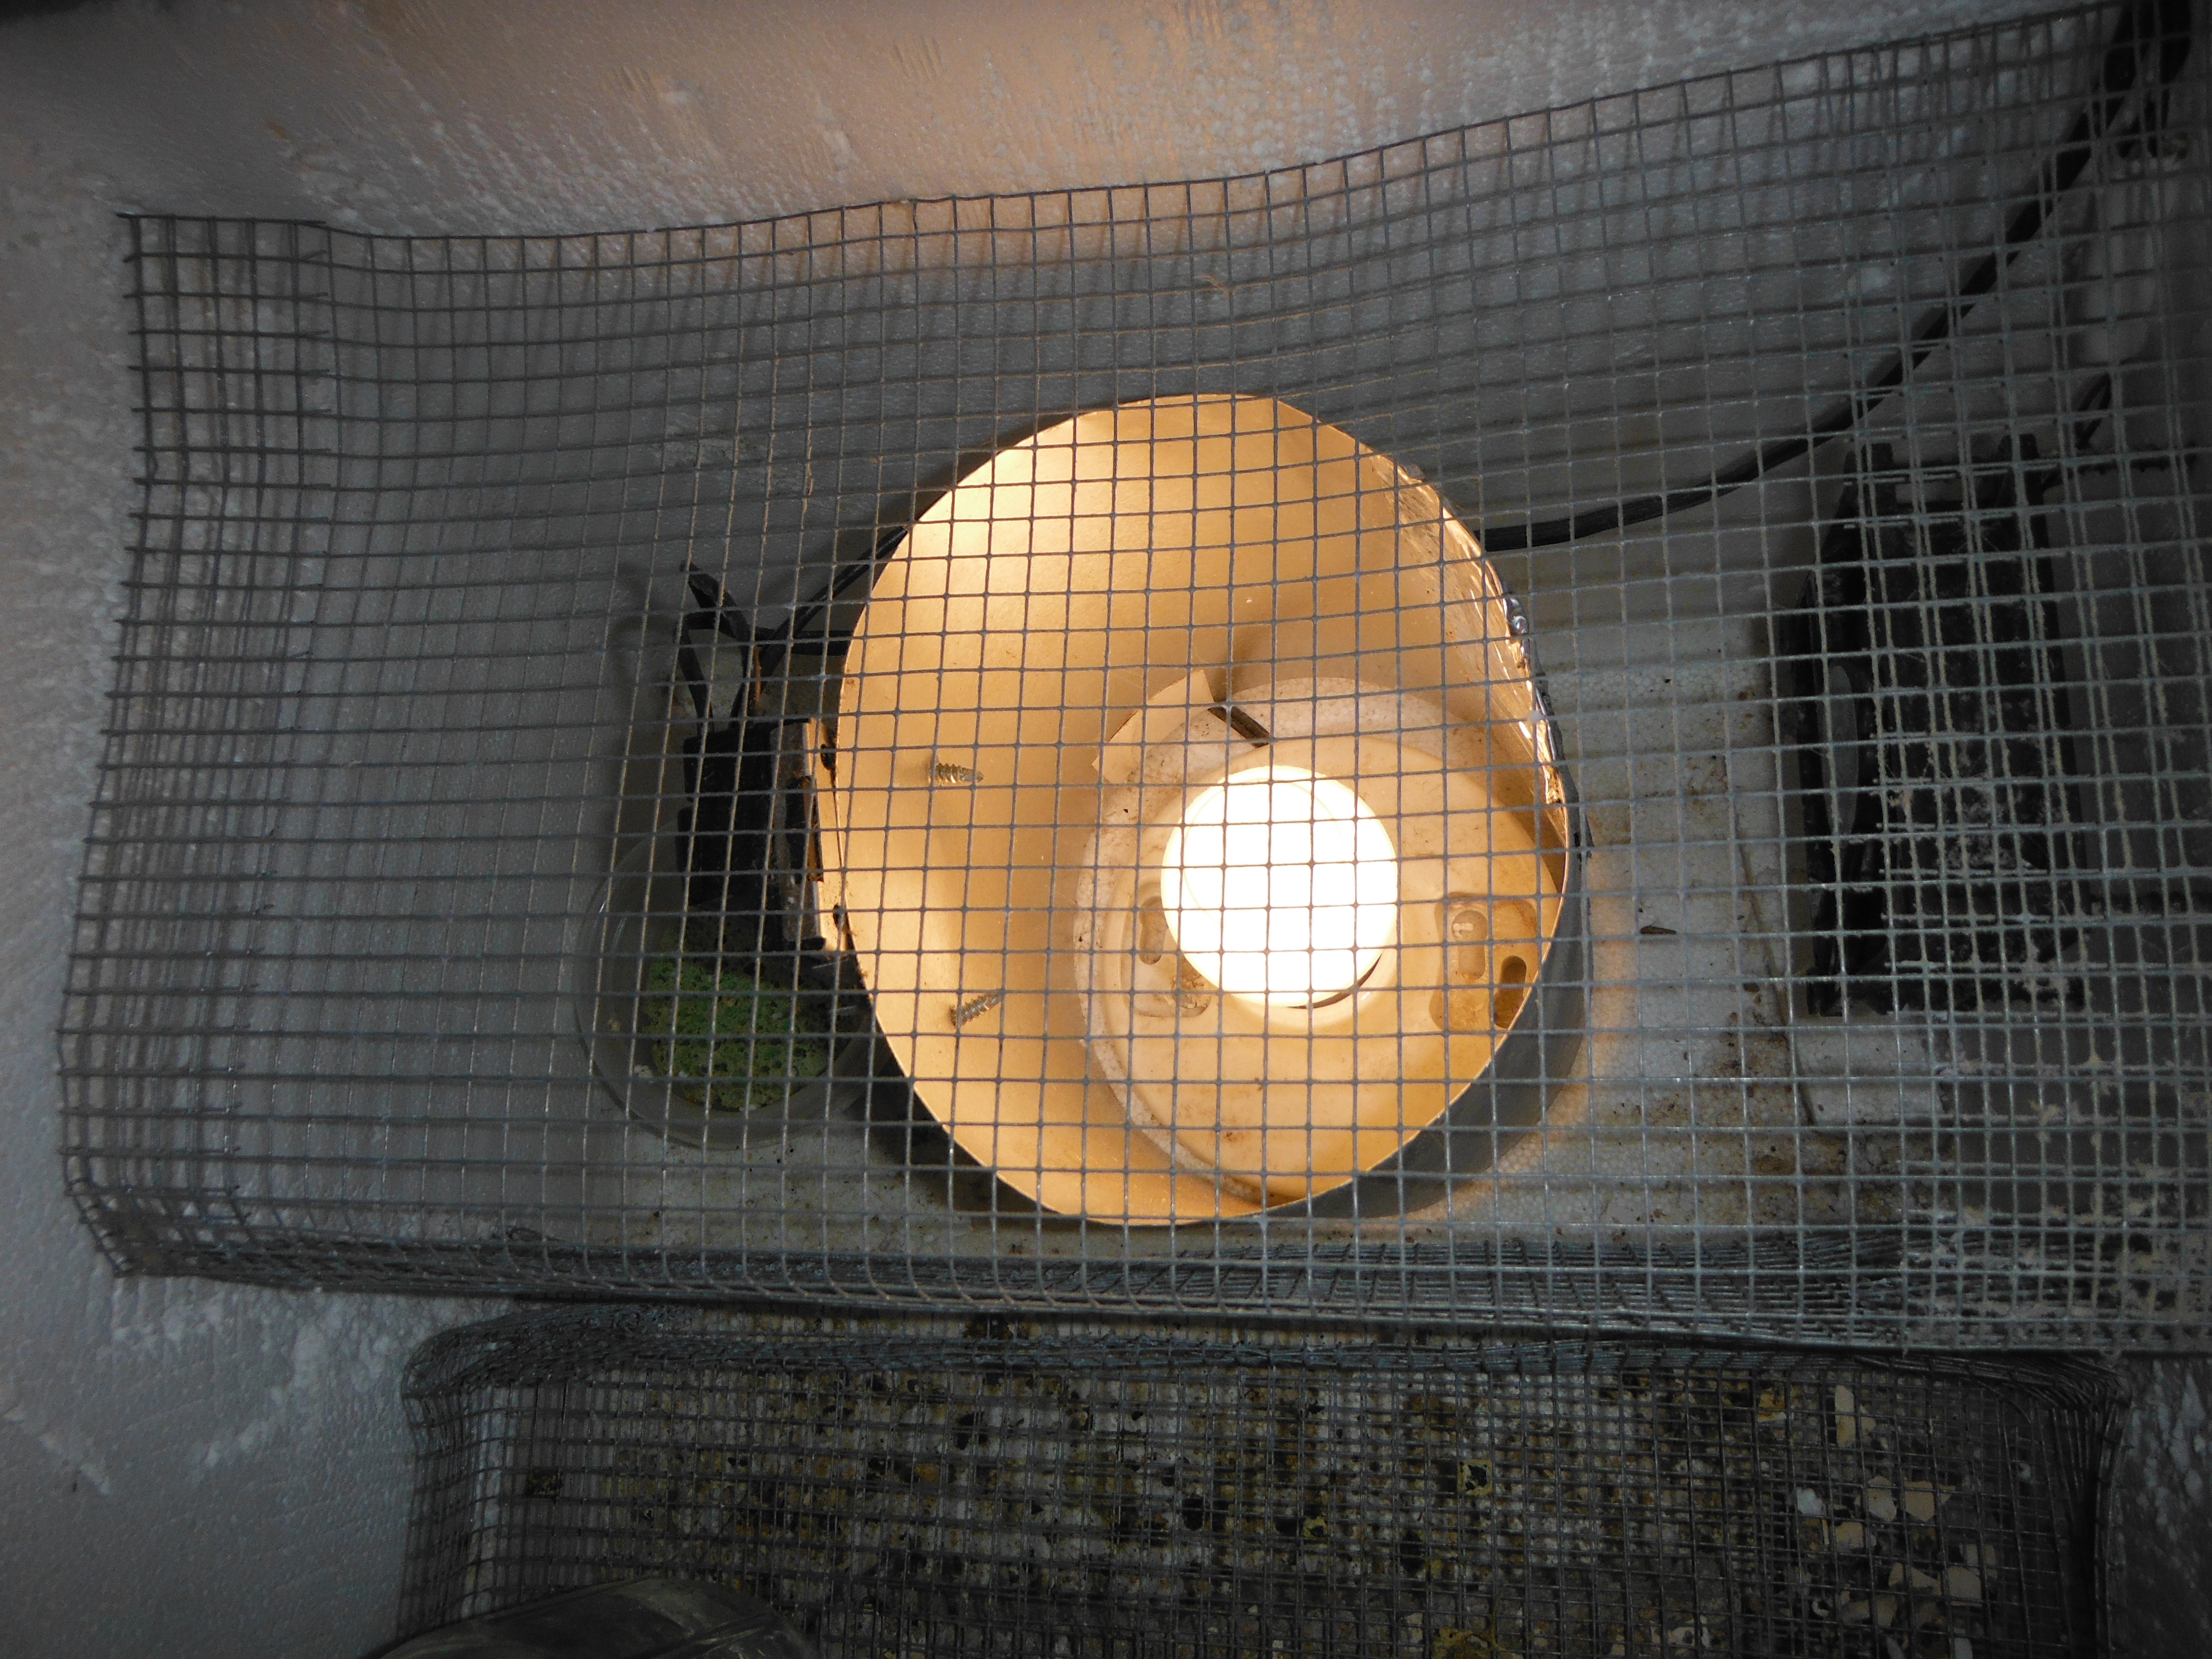
The hardware cloth was bent into a tray and sits on the paver on the bottom. This holds the eggs, the water jar and the thermometer. Another piece of hardware cloth is installed vertically as a barrier to prevent any of the hatched chicks to get into the light fixture section. This is also folded over the top of the light bulb section to isolate the electrical bits completely.
A 80mm fan from a PC was screwed into the Styrofoam with long drywall screws holding it off of the wall to allow circulation. The fan was wired into a 12v wall charger from a Blackberry. Wires for the fan and the light were run though holes in the side. Additional holes were cut on two sides to allow for fresh air to get in and allow some moisture to get out. A small dish with a sponge was also placed next to the light fixture to help regulate humidity.
I initially had two digital thermometers, since they were inexpensive and I didn’t trust them. It is not uncommon to have variance +/- of 2-3 degrees. I wanted to make sure I had a valid reading on my thermometer as I used it to adjust the thermostat.
In the lid, I cut a hole, slightly smaller than the piece of glass I snagged from the picture frame. The glass was then fastened into place and acted as a view port to watch the eggs.
That is the construction. It took me about an hour, once I had all of the parts gathered.
Once it was ready to go, I filled the bowl with the sponge, and fired it up with the thermostat set in the middle range of the temps it could read. After 48 hours I checked it, and adjusted the thermostat until I had a constant 99 degree environment.
I let it run nonstop for three days, making sure that it stayed near to the optimum temps and humidity. Once I was happy with its performance, I placed eggs into it to hatch out.
My first attempt at hatching eggs with this incubator was with chicken eggs. I was given 26 fertile chicken eggs from a great family friend, Sparkle. At the time, she had over 50 chickens, several of them being roosters. (Once you have an incubator that provides a steady environment, egg fertility is probably the most important ingredient in getting a good hatch rate.)
The eggs should all placed at the same time. (Hatching chicks of any species are rather ruthless, and a chick that is a few days older will bully a smaller bird literally to death. Birds are cruel to the smaller, weaker, and strange. So try to set, hatch, and house birds together from day one. Introducing a strange bird into a flock can have lethal results for birds, the “locals” will gang up on the new one.)
Incubating eggs need to be rotated several times a day so that the embryo doesn’t stick to the side. For the last 2-4 days, depending on the bird species being incubated, no egg rotation is done so that the hatching bird can get into the position to break out of the shell. Also, when you stop egg rotation, increase humidity to make the egg shells a little softer and the chick less likely to stick to the drying shells.
Of the 26 eggs placed in the incubator, we ended up with 23 hatching out. That is a fantastic hatch rate! And FAR better than I was expecting! I only wanted about 6 chickens, so planned on a LOT of failures… We ended up giving several of the new chickens back to Sparkle. In hatching any eggs, be sure to have an exit strategy! Know what you are going to do with the birds after you have them!
The second attempt at hatching eggs with my home made incubator was with quail eggs, ordered online. They had a 90% or so hatch rate as well. I’ve consistently had about 90% hatch rates with my home made incubator, and I’m very happy with that. My last hatch, the ones on yesterday’s live video, had a 75% hatch rate, but I attribute part of that to egg fertility. I only have a single male for my 8 females, a very low ratio. For optimal fertility, 3-5 females per male is a much better ratio.
Yesterday, I received 60 eggs from Farmdad01 on eBay, for $20 shipped. The auction was for 50 eggs, but I was sent 60. His packaging was done very well, and only two arrived broken. Watch a video of him packing the eggs here.
(I watched it and when I saw that he packed the eggs in the egg cartons made for quail eggs, I have very excited. We have been using the same one egg carton for the last three years. Pretty stoked to get TWO more! It’s the little things in life that make it worth living, right?)
Here is my incubator, in action and a brief description.
So as I’m writing this, I have 58 quail eggs warmed up and hopefully, starting to develop. By doing a little math, I can plan ahead. Eggs placed x expected hatch rate gives us between 43 and 52 birds. At a 50/50 male to female ratio, I should end up with 20-25 of each gender. Assume I’ll keep all the females for egg production (yielding the equivalent of 4-5 chicken eggs per day), and the males required at a 5 to 1 female to male ratio, and that I’ll have between 18 and 21 male birds to left over harvest.
- On May 9th or 10th, they should hatch.
- On June 1st, they should be fully feathered and ready for a grow out cage.
- June 8th, I will start seeing eggs.
- Birds will be ready to harvest on June 23
- By harvest day, this batch of birds will have also already produced over 100 eggs, equivalent to 20-25 chicken eggs!
Not counting food, time, or electricity, that’s about $1 per bird, and doesn’t factor in the eggs.
And at an egg per bird a day, in two or three days, I’ll be able to start another 60 or so eggs.
It isn’t exact math, but its fairly close, and even at triple that price, I think its a good deal.
Where can you find a quail dinner for under $10? And one that can be repeated every 60 days and provides eggs along the way….
YUM!
Tomorrow, brooder boxes, feeders and waterers.
Peace,
db
As always, please “like” FloridaHillbilly on Facebook, subscribe to my feed, follow me on Twitter, add it to Google+, Pinterest, Linkdn, Digg, and/or tell your friends! The more folks that start taking control of their own lives, the fewer folks that will try to control yours.
Need something from Amazon (and who doesn’t)? I earn a small commission from purchases made when you begin your Amazon shopping experience here. You still get great Amazon service and your price is the same, no matter what.
Hello!i wood like to now ,do I need male quael for produce eggs for the female ? Or you do not need the male! I just start get interesting for Hobbes !if yes , per how many female?i want to start total of 12 birds! And how many time a day I have to give food!!thank you!!
No male is needed to produce eggs. However, to produce FERTILE eggs, a male IS needed.
I like a ratio of 1 male to 3 to 6 birds. So from 1:3 to 1:6/ For twelve birds, I’d add in at least two males. If twelve is your max including males, then go with 9 or 10 females, the rest males. Again, only if you plan on hatching out your own eggs, otherwise, no need for males.
How many time you have to feed the birds a day?
I provide feed for them to eat all day long via an auto feeder.
Eating all days makes them grow faster!
Hi! I understand all day feed is good! But for regular schedule time
How many time feed is good?? Thank you!
I really cannot answer that, as I only feed “all day”, offering as much as they want to eat, whenever they want to eat. Remember, I’m raising them to provide food, so why would I short-change their growth?
Peace,
db
Hi!can you tell me please what I shot do ,one of my quael can’t open his eiys .i don’t now how is happen?can have any ideas what medicin is good?thank you !
Probably from other quail pecking them. Cull the bird would be my suggestion.
Hi!what temperature need to have for quail eggs to all chicks to be female ?
i like the project
Thanks! 🙂